
We Are Revamping How Restore Is Done

The latest release combines a redesigned local NovaBACKUP agent with a new way to back up and restore your PCs and servers.

The new release is available for free for everyone with an active PC Agent or Server Agent subscription.

Check Before You Upgrade Download the Latest Version


Before You Upgrade

Before you start your upgrade to the latest version of NovaBACKUP, check the following:

Next, download the latest version of NovaBACKUP and install it over your existing installation.


Are you running image backups?

The new version replaces the image backup feature with a Disaster Recovery option. That means, current image backup jobs need to be replaced with the new option.

Good to know: Your image backups and your new Disaster Recovery system backups can run simultaneously while you switch. Once you're confident your system backups work, remove the image backup schedule and let its retention run out.

You can find all the details about how to move your legacy image backups to the new Disaster Recovery function here. In summary:

  1. Check what your retention setting is. That’s the amount of days, weeks, or months, you will want to keep your image backup jobs before deleting them.

  2. Create a boot media before you stop your image backups, so you can still restore from them later.

  3. Next, pause the image backup schedule.

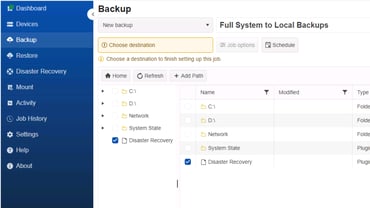
  4. After you upgraded to the latest version, create a system backup job in the backup tab. Check the box “Disaster Recovery”.

  5. Add your schedule and where you want to store the system backup. You can pick between your local storage or a connected cloud storage.

  6. Once the retention of your legacy image backups passed, you can delete the backup files.

You can find more details about the new Disaster Recovery function here.


Need help with the switch? Reach out to support.

Are you running backups with the virtual dashboard?

The Virtual Dashboard has been removed from NovaBACKUP. Instead, you can create backups of your Hyper-V host from the backup tab.

Good to know: Your current and your new VM backups can run simultaneously while you switch. Once you're confident your VM backups created via the backup menu work, remove the backup schedule from the Virtual Dashboard and let its retention run out.

Here is how you can switch from backup jobs running in the Virtual Dashboard to backups of your VMs inside the backup menu:

  1. Check what your retention setting is. That’s the time, you will want to keep your virtual machine backup jobs before deleting them.

  2. Next, pause the backup schedule.

  3. After you upgraded to the latest version, create a backup job in the backup tab and the select the VMS you want to protect.

  4. Add your schedule and where you want to store the system backup. You can pick between your local storage or a connected cloud storage.

  5. Once the retention of your legacy virtual backups passed, you can delete the backup files.


Need help with the switch? Reach out to support.

Note: VMware backups are no longer supported.

Knowledgebase Download the Latest Version

What's New?

You can find all the details on the what’s new page and our release blog post.

Agent UI Resource Images

The Redesigned NovaBACKUP Agent

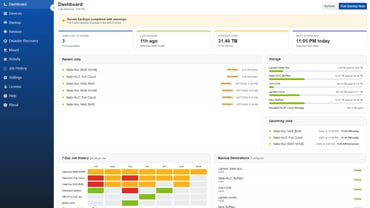
The agent has a new look and a clear layout. You can see the status of your backups at a glance and dive deeper in one click.

  • Dashboard: see whether your jobs ran and click through to details and logs.
  • Activity and job history: follow what's running now in the activity tab, and filter your job history to find past runs.
  • Backup tab: set up your first backup job with guided steps.
  • Restore and mount: both are easier to find and start.
DR Job Resource Images

System Backup and Restore

System backups are now set up at the same spot as file backups.

  • Every system backup includes everything you need to restore the entire system, including drivers, system settings, etc.
  • Less storage is required to store the regular system backup files and the system backup can now also be stored in your connected cloud storage.
  • Recoverability verification checks system backups before each run and backs up anything that is missing on the backup storage.

To turn it on, select the Disaster Recovery option in your job's Backup tab.
Hyper V Resource Images

System Restore Directly to a Hyper-V VM

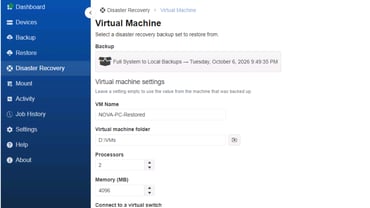
In addition to restoring your PC or server to the same or different hardware, you can now also mount a system backup as a Hyper-V virtual machine directly from within NovaBACKUP. Use it to test your restores, keep working during an outage, or move a computer to a virtual machine.
Restore Resource Images

Recover From the Cloud

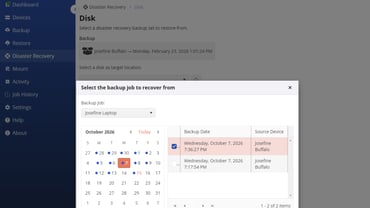
Continue to backup your PCs or servers to local storage, such as NAS or disk or (new) add an S3-compatible storage or the NovaBACKUP Cloud as a backup destination to your system backup job.

Hybrid backup jobs that back up to a local storage first and then to the cloud storage are supported as well.

System restores from either storage type are supported for recovery on new or dissimilar hardware, as well as when mounting the system backup as a Hyper-V VM.
Multi Stream Resource Images

Multi-Stream Restore

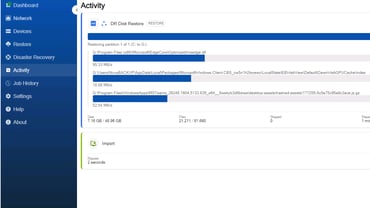
Restores you start via the local NovaBACKUP agent can run in several streams at once.

You set the number of streams as well as the threshold of files that starts a new stream. Then, raise it for cloud and slower NAS targets, or lower it during business hours.
Further Resource Images

Further Improvements

See everything that's new in the Changelog.

Removed Resource Images

Removed Features

The following features and add-ons have been removed:

  • The image backup add-on (replaced by the Disaster Recovery function that is now in the Backup menu).
  • The virtual dashboard add-on (Hyper-V backups moved into the Backup menu; VMware backup is discontinued).
  • Copy jobs have been removed.

Frequently Asked Questions

Is the new release included with my license?

Upgrades to the new release are included with all active NovaBACKUP Managed Backup, NovaBACKUP Server Agent, and NovaBACKUP PC Agent licenses and subscriptions.

If your license or subscription has expired, please contact our sales team.

How do I upgrade?

NovaBACKUP Managed Backup

New features applicable to the central management are available automatically. For example, the ability to create a system backup with the new Disaster Recovery function is already available when creating a new or updateing an existing backup job.

To see how to upgrade the local agent, take a look at this video.

NovaBACKUP Server Agent or PC Agent

Download the latest version from this page and install it over your existing installation. You can find additional information in our knowledgebase.

Do I have to update my backup jobs before upgrading?

No, your backup jobs will continue to run after the upgrade. Depending on the job type, however, you might not be able to edit or update the backup jobs in the new agent interface.

You might want to update image backup jobs, jobs running via the Virtual Dashboard, or backup jobs that never switched to the current backup engine either before or shortly after you upgrade, so that you are completely moved over to the new version going forward.

What happens to my image backups?

Scheduled image backups will keep running, and you can edit them using the legacy UI.

To move to the new Disaster Recovery system backups, turn on the Disaster Recovery option in your backup job. Once your system backups work, stop the image backups and let their retention run out.

Can I go back to the legacy version?

Yes. Contact our support team and we'll walk you through it.

What systems are supported with the new version?

Check our system requirements for all the details.

I'm a partner or reseller. Where do I find more details?

Please review our FAQs for partner here.

Back to top

Resources

What's New

Overview of all the new features

Release Announcement
Knowledgebase

Changelog

Knowledgebase

Release FAQ for partners